Unable to Setup Rockspace WiFi Extender?
To enhance the existing internet network throughout the house, Rockspace extender setup is a great option. Setting up Rockspace WiFi extender is easy. But, if you are not able to set up the extender at your home, you don’t need to search anywhere else. On this page, we have given a simple guide and a video tutorial to help you extend your network easily.
Various Methods of Rockspace Extender Setup
There are two simple and effective ways to set up your Rockspace extender: WPS and web interface. You can choose either of the methods to easily configure your device without any trouble. Although information about this has been mentioned in the Rockspace WiFi extender manual, users find it difficult to execute. So we have provided clear instructions for both methods.
Web Interface Method
In this process, you need to connect the Rockspace extender to power socket and access its web interface by entering the default IP & URL address in a browser. Login using default credentials, follow the steps given on the setup wizard to configure and connect the extender to the existing Wi-Fi network.
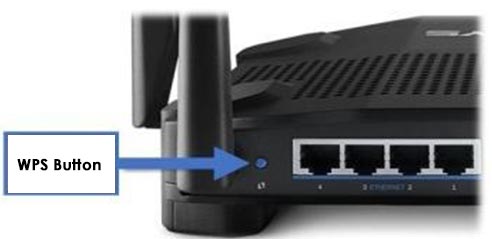
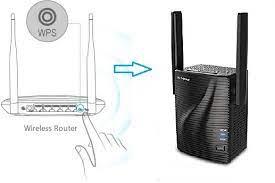
WPS Method
This method is very easy to perform. You only need to plug in the Rockspace extender, press and hold the WPS button until the light blinks. Press the WPS button on the Wi-Fi router within 2 minutes to establish a secure connection. However, the time frame of pressing the button on both devices should be 2-3 minutes.
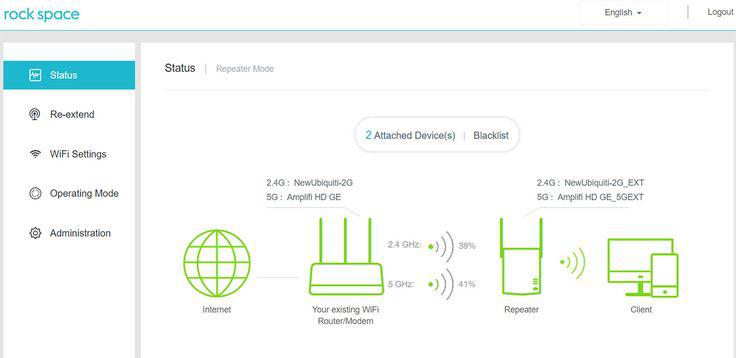
Rockspace Extender Setup via Web Interface
Step 1: Reboot the Router
- The very first thing you need to do is reboot the host router.
- Turn off the router by pressing the power button.
- Remove the power cable from the wall outlet.
- Keep waiting for at least 2-5 minutes.
- Plug the router’s power cable back into the socket.
- Press the power button.
Step 2: Find a Location
- Now you have to look for the optimal location for your extender.
- The extender should be placed within the range of the host.
Note: Avoid placing the extender near electronic devices that may cause interference, such as cordless phones or microwave ovens.
Step 3: Connect the Extender to Router
- Take a good Ethernet cable to make the connection between the router and extender.
- Now, insert one end of the Ethernet cable into the router and another into the extender.
- The connection should be strong between the devices; otherwise, you may face network issues.
Step 4: Power on the Rockspace Extender
- Plug the extender into the well-working wall outlet.
- Press the Power On button.
- Wait for some time until the device is properly powered on.
Tip: From here you need to check all the connections whether it is a connection to power or the internet.
Step 5: Open the Web Browser
- Turn on the computer or laptop.
- Connect your computer or laptop to Rockspace_ext SSID.
- Now, open an updated internet browser.
Step 6: Access the Web URL
- In the address bar, type the default IP or web address.
- The default IP 192.168.0.254 or re.rockspace.local.
- Press Enter.
Step 7: Create Your Password
- On the extender’s setup page, you will be prompted to set the password.
- This password is used for your later login.
- Click on the Next button.
- Once logged in, you will be directed to the extender’s configuration interface.
Step 8: Setting Up Extender
- Select your existing Wi-Fi network SSID which you want to extend.
- Enter the network’s password. The information about the WiFi password can be found in the Rockspace WiFi extender manual.
- Ensure that you select the correct WiFi network.
- Input the respective WiFi password and hit Connect to extend the network.
Step 9: Complete the Setup
- After configuring the extender’s settings, click on the “Apply” or “Save” button to save the changes.
- Wait until the page shows you “Extended successfully”!
This completes the Rockspace WiFi extender manual method of setup. Once the extender is connected, you can unplug the Ethernet cable from your computer or laptop and use the extended Wi-Fi network wirelessly.
Rockspace Extender Setup via WPS Button
Here are the steps to perform the Rockspace WiFi extender setup using the WPS button:
- Initially, plug your Rockspace extender near the host router.
- Now, press the power on button to proceed further.
- Locate the WPS button on the Rockspace extender as well as the router.
- Press the WPS button on the router.
- Within 2 minutes press the WPS button on the Rockspace extender.
- Now, wait until the LED on the extender blink, which indicates a successful connection.
- If the Signal LED does not blink, try again.
In this manner, you can configure your Rockspace extender easily via the WPS button.
Important Points
Make sure to update the firmware of your Rockspace extender regularly to ensure optimal performance and security.
Experiment with different placements of the extender to find the position that provides the best Wi-Fi coverage in your desired area.